Android Quick Start Fundamentals
Guide to the important Android components and concepts that are needed to create an app
Updated 10 August 2023
This section will introduce common Android components and concepts that will help you understand the demo plugins and get started with creating your own plugin. The Android developer website docs cover all topics discussed in this section in greater detail and are maintained with the latest changes to Android. This section guides you to the pages within the developer docs that provide a foundation of Android principles needed for ATAK development.
This document is derived from the Official Android Developer Guides and the Official Android App Fundamentals webpages. Explore these guides if you want to learn more about the Android nuts and bolts behind ATAK.
Contents
Lifecycle
The following are notable classes or components that have their own lifecycles (making them LifecycleOwners), and are aware of changes in their lifecycle status (Lifecycle-aware): Activities, Fragments, Dialogs (specifically DialogFragment), and Services. Read more about lifecycles on Android’s official website here.
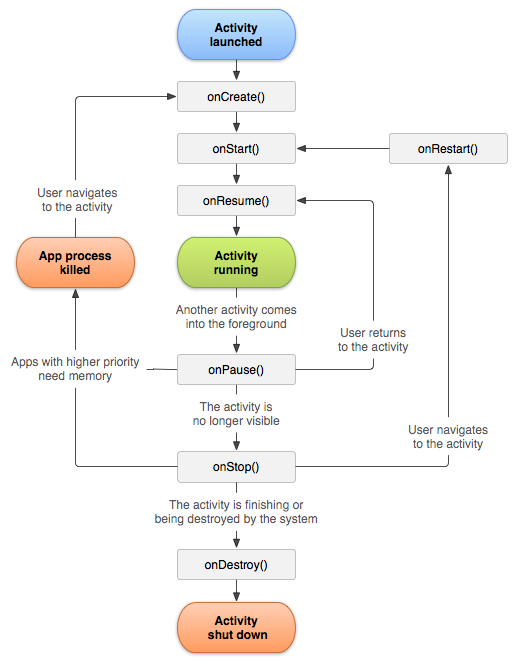
Android Activity Lifecycle: States and Events
sequenceDiagram
	participant INITIALIZED
    participant DESTROYED
    participant CREATED
    participant STARTED
    participant RESUMED
    Note over DESTROYED, INITIALIZED: (initial state & dead state)
    INITIALIZED->>CREATED: ON_CREATE
    CREATED-->>STARTED: ON_START
    STARTED-->>RESUMED: ON_RESUME
    RESUMED-->>STARTED: ON_PAUSE
    STARTED-->>CREATED: ON_STOP
    CREATED-->>DESTROYED: ON_DESTROY
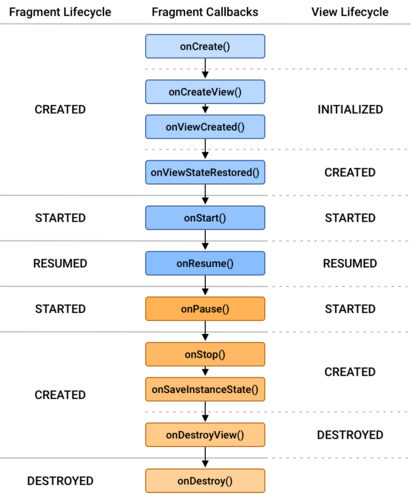
Android Fragment Lifecycle: States and Events
Activities
Activities are the entry point for an application’s interaction with the user. They provide a user interface for the plugin. Each Activity instance transitions through different states in their lifecycle as a user navigates in and out of an application. Implementing callbacks for lifecycle state changes will help avoid problems such as application crashing, overconsumption of resources, and loss of user progress when changing between apps. For example, you don’t want your application being slowed down during use because another app is consuming more resources than it needs. There is a lot of to learn about Activities and Lifecycles if this is your first time working with Android, but they are essential to understand when designing your own plugin.
Almost all activities interact with the user, so the class creates a window which you can place your UI using setContentView(View) (defined in res/layout folder of the project). Within you Activity class you can define behavior for what happens when a user presses a button or enters information within the UI.
Here’s the typical steps required to create an Activity that can be loaded in your Android application:
Define an Activity Class: In your project, create a new Java class that
extends Activityor one of its subclasses (e.g.LauncherActivity).Create the layout resource (if needed): Create a
*.xmlfile for the Activity class to load. This is not required if the Activity uses an existing layout resource defined within your project, third party library or Android standard resource.Declare the Activity in the project’s Manifest: Add the following line in the
AndroidManifest.xml. This provides essential information to the Android system about your Activity.<activity android:name=".ACTIVITY_NAME"> </activity>
Read more about acitivities on Android’s official website here.
Intents
Intents are abstract descriptions of an operation to perform. They can be used to start activities, send information to BroadcastReceiver components, and communicate with a background Service. Within the ATAK plugin ecosystem they are the key object behind launching a plugin’s UI panel. Intent objects can also pass variables if the receiving components need to operate on user string inputs, raw photo data, or other objects. Below are steps that you should follow to define a new DropDownReceiver within your plugin:
Define a unique Action string: Create a
public static final Stringat the beginning of theDropDownReceiverclass which is globally unique. Using the package name of your plugin ensures the uniqueness of the string you define. An Intent sent with this string value for the action will trigger theDropDownReceiver’s pane to pop up.public static final String SAMPLE_ACTION = "com.atakmap.android.plugintemplate.PluginTemplateDropDownReceiver.SAMPLE_ACTION";Define handler logic in
onReceive: Write the necessary code within yourDropDownReceiverclass to process the intent for the action and display the plugin pane. You could also have multiple actions if the receiver is designed to simply process data.public void onReceive(Context context, Intent intent) { if(intent.getAction().equals(SAMPLE_ACTION)){ //TODO: showDropDown() } }Register the receiver in the plugin
MapComponent: The following registers theDropDownReceiverwhen the plugin is loaded in ATAK. It is necessary to register your receiver if you want your handler to operate on intents.SampleDropDown sampleDropDown = new SampleDropDown(lView, pluginCtx); DocumentedIntentFilter filter = new DocumentedIntentFilter(); filter.addAction(SampleDropDown.SAMPLE_ACTION); this.registerDropDownReceiver(sampleDropDown, sampleFilter);
Now you can create and send an intent to trigger this DropDownReceiver with:
      Intent intent = new Intent();
    intent.setAction(SampleDropDown.SAMPLE_ACTION);
    intent.putExtra("data", "Nothing to see here, move along.");
    sendBroadcast(intent);
Read more about intents on Android’s official website here.
ViewModels
ViewModels provide data persistence in a Lifecycle-conscious way. Using a plain class to hold data displayed on a UI destroys the data upon switching activities, unless it’s sent through intent to the next activity or stored using the saved instance state. With ViewModels, the data is cached and persists through configuration changes. This means that your UI doesn’t have to fetch data every time activities are switched or the UI configuration changes. If you are working with a lot of data that needs to be accessed by several different activities, you should use ViewModels.
ViewModels can be used with Android’s Room persistence library to communicate between the UI and a Repository that acts as an API to the database. Here is an example of how to implement and use a View Model class in ATAK.
Read more about ViewModels on Android’s official website here.
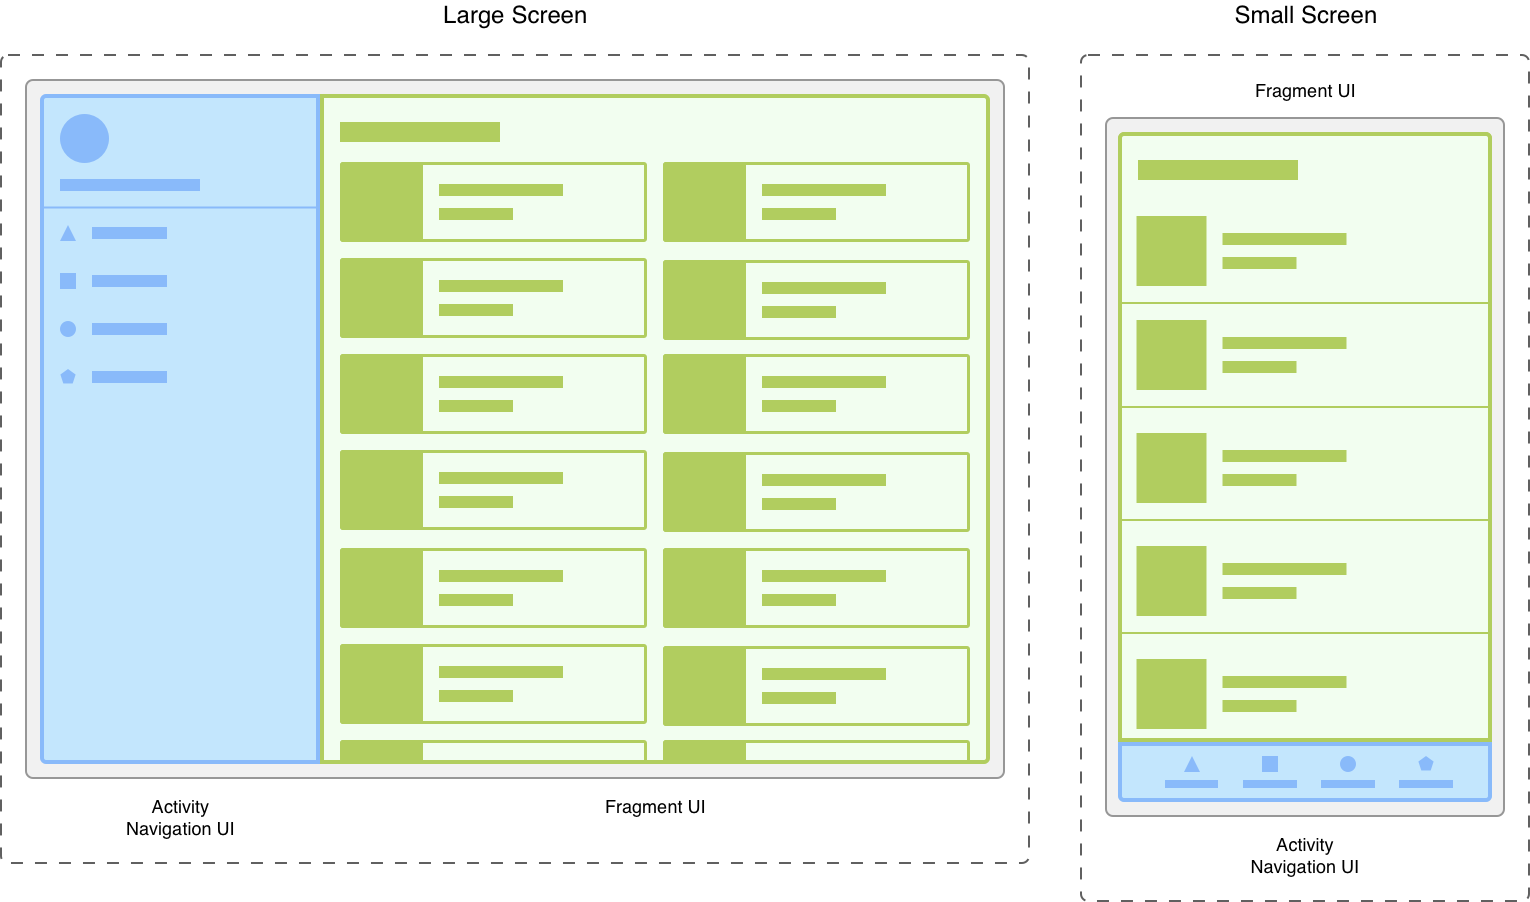
Fragments
Fragments allow you to have multiple pages contained within a single activity. If you need a dynamic UI with tabs, a swipe view, or a navigation bar, use Fragments. Check out the document here for a tutorial.
Read more about fragments on Android’s official website here.
Services
Services allow your application to perform long-running operations in the background. They do not provide a user interface element and are more resilient to changes from navigating between applications. Some examples of service actions are handling network transactions, playing music, performing file I/O, or interacting with a content provider. Another example of a service is a GPS tracker. You can create a GPS class that gets a location in the background without any UI input.
This section covers Foreground, Background, and Bound services.
Foreground Services
Foreground services perform an operation that is noticeable to a user, like playing music. These services must display a Notification that cannot be dismissed to let the user know that the service is running. Think of how Spotify/Apple music shows a notification of what song you’re listening to. Foreground services can continue running when the user isn’t interacting with the app. Click here to learn more about setting up foreground services.
Background Services
Background services perform operations that aren’t directly noticed by a user, such as using a service to compact an app’s storage or tracking GPS location.
Bound Services
Bound services “bind” app components to themselves by calling bindService(). This service provides a client-server interface that can allow components to interact with the service, send requests, and receive results. This service is destroyed when all components unbind from it. Click here to read more about Bound Services.
Demo-hello-world provides a good tutorial for setting up and creating your own service.
Read more about services on Android’s official website here.